Sometimes the Modem, Router and Main Switch are one unit, or there is no modem.
-----> Single Arrow is a limited access network (VLAN)
<----> Double Arrows is an Open Network
The key point here is that the servers are isolated on a separate switch for performance and security reasons, using a VLAN (Virtual Local Area Network) local to the Server Switch. Server VLAN network packets between each other never leave the Server Switch. Each server has another IP address not on the VLAN for public access.
A guest WiFi service does not have access to the Main Switch because it is on it's own VLAN, so local resources are protected from that experimental 12 year old guest.
If my camera accesses a cloud service (most do), then I link it to the Guest WiFi for security purposes. Any other untrusted device will also be on the Guest WiFi, like Robot Vacuum Cleaners, Car Chargers, Car, TV streaming box, VOIP (Telephone VoiceOverIP), Garage Door Opener, Door Locks, etc...
Always refresh the package repository before getting started.
$ sudo dnf update
Now I can disable subscription-manager since I do not have a RedHat subscription.
Change:
From -> enabled=1
To -> enabled=0
In file: /etc/yum/pluginconf.d/subscription-manager.conf
$ sudo vi /etc/yum/pluginconf.d/subscription-manager.conf
$ sudo yum clean all
0 files removed
You may need to add extra repositories, just check the sources.
The EPEL repository provides additional high-quality packages for RHEL-based distributions. EPEL is a selection of packages from Fedora, but only packages that are not in RHEL or its layered products to avoid conflicts.
The folks at Fedora have very nicely put up an automatic build and repo system and they are calling it COPR (Cool Other Package Repositories).
Be sure to match the same user numbers across systems, because when sharing files using NFS, the numbers need to match.
$ sudo adduser don --uid 1001
Adding user `don' ...
Adding new group `don' (1001) ...
Adding new user `don' (1001) with group `don' ...
Creating home directory `/home/don' ...
Copying files from `/etc/skel' ...
New password:
Retype new password:
passwd: password updated successfully
Changing the user information for don
Enter the new value, or press ENTER for the default
 . . .  Full Name []: Don
 . . .  Room Number []:
 . . .  Work Phone []:
 . . .  Home Phone []:
 . . .  Other []:
Is the information correct? [Y/n] y
Adding new user `don' to extra groups ...
Adding user `don' to group `dialout' ...
Adding user `don' to group `i2c' ...
Adding user `don' to group `spi' ...
Adding user `don' to group `cdrom' ...
Adding user `don' to group `floppy' ...
Adding user `don' to group `audio' ...
Adding user `don' to group `video' ...
Adding user `don' to group `plugdev' ...
Adding user `don' to group `users' ...
If this user is an administrator;
Debian
$ sudo usermod -aG sudo rootbk
Check user for group '27(sudo)'.
$ id rootbk
uid=1002(rootbk) gid=1002(rootbk)
groups=1002(rootbk),20(dialout),24(cdrom),25(floppy),27(sudo),29(audio),44(video),46(plugdev),100(users),114(i2c),993(spi)
RedHat
$ sudo usermod -aG wheel rootbk
Check user for group '10(wheel)'.
# id don
uid=1002(rootbk) gid=1002(rootbk) groups=1002(rootbk),10(wheel)
127.0.0.1     localhost
192.168.1.5     www.example.com     example.com www

# The following lines are desirable for IPv6 capable hosts
::1     localhost ip6-localhost ip6-loopback
ff02::1 ip6-allnodes
ff02::2 ip6-allrouters
File: /etc/hostname
don.example.com
Rsyslog - Send Syslog Entries to Remote Syslog Host
It is a good idea to send log messages to another host in case the system crashes. You will be able to see that last gasping breath of the dying server. Also in the event of a compromised system hackers usually zero out the local syslog to cover their tracks. Now you still have any trace of the hackers on the central rsyslog host. It makes things simpler for detailed log analysis with combined logs on one system too.
Local System
Replicate log entries: Add the following to cause log entries to be in /var/log/syslog locally and be sent to a remote syslog host. If you do not have a Remote Syslog Host, skip this.
File: /etc/rsyslog.conf
Add these lines on local system.
~
# Remote logging - Aug 2020 Don
# Provides UDP forwarding
*.* @192.168.1.5:514 #this is the logging host
~
Alert: Create the following to send syslog alerts to email if the severity is high (3 or below).
File: /etc/rsyslog.d/alert.conf
Create the file if it does not exist and replace with these lines.
module(load="ommail")
template (name="mailBody"  type="string" string="Alert for %hostname%:\n\nTimestamp: %timereported%\nSeverity:  %syslogseverity-text%\nProgram:   %programname%\nMessage:  %msg%")
template (name="mailSubject" type="string" string="[%hostname%] Syslog alert for %programname%")

if $syslogseverity <= 3 and not ($msg contains 'brcmfmac') then {
   action(type="ommail" server="192.168.1.3" port="25"
          mailfrom="rsyslog@localhost"
          mailto="don@example.com"
          subject.template="mailSubject"
          template="mailBody"
          action.execonlyonceeveryinterval="3600")
}
Remote Syslog Host
Allow remote hosts to log here: Open firewall port 514/udp on remote syslog host.
$ sudo ufw allow 514/udp
File: /etc/rsyslog.conf
Add these lines to remote syslog host.
~
# provides UDP syslog reception
module(load="imudp")
input(type="imudp" port="514")
~
# Process remote logs into seperate directories, then stop. Do not duplicate into syslog
$template RemoteLogs,"/var/log/%HOSTNAME%/%PROGRAMNAME%.log"
*.* ?RemoteLogs
& stop
Restart rsyslog
$ sudo systemctl restart rsyslog
Time Control
All servers should be set up to synchronize their time over the network using Network Time Protocol (NTP). This is critical in validating security certificates. For offline systems, consider using a Real Time Clock (RTC) attached to something like BeagleBone.
TODO: Link to Beaglebone
timezone
Change to match your timezone.
File: /etc/timezone
$ cat /etc/timezone
America/New_York
Set timezone with timedatactl, and verify.
$ sudo timedatectl set-timezone America/New_York
$ timedatectl
               Local time: Sun 2022-10-09 18:27:11 EDT
           Universal time: Sun 2022-10-09 22:27:11 UTC
                 RTC time: n/a
                Time zone: America/New_York (EDT, -0400)
System clock synchronized: yes
              NTP service: active
          RTC in local TZ: no
$sudosystemctlstatussystemd-timesyncd
*systemd-timesyncd.service-NetworkTimeSynchronization
Loaded:loaded(/lib/systemd/system/systemd-timesyncd.service;enabled;vendorpreset:enabled)Drop-In:/lib/systemd/system/systemd-timesyncd.service.d
└─disable-with-time-daemon.conf
Active:active(running)sinceSun2022-07-2412:06:36EDT;2weeks3daysago
Docs:man:systemd-timesyncd.service(8)MainPID:559(systemd-timesyn)Status:"Synchronized to time server for the first time 192.155.94.72:123 (2.debian.pool.ntp.org)."Tasks:2(limit:951)Memory:1.0M
CGroup:/system.slice/systemd-timesyncd.service
└─559/lib/systemd/systemd-timesyncd
Install an SMTP daemon to transfer mail to the E-Mail server.
Debian
Install postfix
$ sudo apt-get install postfix
Reconfigure postfix, if it does not pop up, and select satellite system.
$ sudo dpkg-reconfigure postfix
The following assumes your host is named app and your email server is smtp.<domain>
File: /etc/postfix/main.cf
# See /usr/share/postfix/main.cf.dist for a commented, more complete version
# Debian specific:  Specifying a file name will cause the first
# line of that file to be used as the name.  The Debian default
# is /etc/mailname.
#myorigin = /etc/mailname

smtpd_banner = $myhostname ESMTP $mail_name (Debian/GNU)
biff = no

# appending .domain is the MUA's job.
append_dot_mydomain = no

# Uncomment the next line to generate "delayed mail" warnings
#delay_warning_time = 4h

readme_directory = no

# See http://www.postfix.org/COMPATIBILITY_README.html -- default to 3.6 on
# fresh installs.
compatibility_level = 3.6

# TLS parameters
smtpd_tls_cert_file=/etc/ssl/certs/ssl-cert-snakeoil.pem
smtpd_tls_key_file=/etc/ssl/private/ssl-cert-snakeoil.key
smtpd_tls_security_level=may

smtp_tls_CApath=/etc/ssl/certs
smtp_tls_security_level=may
smtp_tls_session_cache_database = btree:${data_directory}/smtp_scache

smtpd_relay_restrictions = permit_mynetworks permit_sasl_authenticated defer_unauth_destination
myhostname = app
alias_maps = hash:/etc/aliases
alias_database = hash:/etc/aliases
myorigin = /etc/mailname
mydestination = app.example.com, $myhostname, app, localhost.localdomain, localhost
relayhost = smtp.example.com
mynetworks = 127.0.0.0/8 [::ffff:127.0.0.0]/104 [::1]/128
mailbox_size_limit = 0
recipient_delimiter = +
inet_interfaces = loopback-only
inet_protocols = all
Check postfix systemd service.
$ sudo systemctl status postfix
● postfix.service - Postfix Mail Transport Agent
     Loaded: loaded (/lib/systemd/system/postfix.service; enabled; preset: enabled)
     Active: active (exited) since Sat 2023-07-22 09:32:00 EDT; 5h 26min ago
       Docs: man:postfix(1)
    Process: 1178 ExecStart=/bin/true (code=exited, status=0/SUCCESS)
   Main PID: 1178 (code=exited, status=0/SUCCESS)
        CPU: 1ms

Jul 22 09:32:00 app.example.com systemd[1]: Starting postfix.service - Postfix Mail Transport Agent...
Jul 22 09:32:00 app.example.com systemd[1]: Finished postfix.service - Postfix Mail Transport Agent.
RedHat
Install postfix
$ sudo dnf install postfix
The following assumes your host is named app and your email server is smtp.<domain>
File: /etc/postfix/main.cf
smtpd_banner = $myhostname ESMTP $mail_name (Linux)
biff = no

# appending .domain is the MUA's job.
append_dot_mydomain = no

# Uncomment the next line to generate "delayed mail" warnings
#delay_warning_time = 4h

readme_directory = no

# See http://www.postfix.org/COMPATIBILITY_README.html -- default to 2 on
# fresh installs.
compatibility_level = 2

# TLS parameters
smtpd_tls_cert_file=/etc/ssl/certs/ssl-cert-snakeoil.pem
smtpd_tls_key_file=/etc/ssl/private/ssl-cert-snakeoil.key
smtpd_use_tls=yes
smtpd_tls_session_cache_database = btree:${data_directory}/smtpd_scache
smtp_tls_session_cache_database = btree:${data_directory}/smtp_scache

# See /usr/share/doc/postfix/TLS_README.gz in the postfix-doc package for
# information on enabling SSL in the smtp client.

smtpd_relay_restrictions = permit_mynetworks permit_sasl_authenticated defer_unauth_destination
myhostname = app.example.com
alias_maps = hash:/etc/aliases
alias_database = hash:/etc/aliases
mydestination = app.example.com, localhost.example.com, localhost
relayhost = smtp.example.com
mynetworks = 127.0.0.0/8 [::ffff:127.0.0.0]/104 [::1]/128 192.168.1.0/32
mailbox_size_limit = 0
recipient_delimiter = +
inet_interfaces = loopback-only
inet_protocols = all
Check the status of postfix
$ sudo systemctl status postfix
[sudo] password for don:
● postfix.service - Postfix Mail Transport Agent
     Loaded: loaded (/usr/lib/systemd/system/postfix.service; enabled; preset: disabled)
     Active: active (running) since Wed 2023-06-07 17:43:43 EDT; 22h ago
   Main PID: 2182 (master)
      Tasks: 3 (limit: 99462)
     Memory: 8.6M
        CPU: 1.975s
     CGroup: /system.slice/postfix.service
             ├─ 2182 /usr/libexec/postfix/master -w
             ├─ 2184 qmgr -l -t unix -u
             └─15581 pickup -l -t unix -u
MAC OS send mail to local server, not system configured in mail app
Use the IP address of the local mail server, or you can edit /etc/hosts and use that name. Postfix does not run as a daemon, but is run by the SMTP process, probably fired of by a listener for port 25.
First install the command line mail interface(s). I use mail and mutt.
Debian
:::Text
$ sudo apt-get install mailutils mutt
RedHat
:::Text
$ sudo dnf install s-nail mutt
% mail -s "Hello internal mail"  don@example.com </dev/null
Null message body; hope that's ok

Shows up as: don@square.example.com
...
mutt -s "Hello internal mail from mutt"  don@example.com

Shows up as: don@square.local
Mutt change from address
File: ~/.muttrc
set from="Square <don@square.example.com>"
set hostname="square.example.com"
Shows up as: don@square.example.com
Update root destination in aliases
File: /etc/aliases
~
# Person who should get root's mail
#root:      marc
root:       bob@example.com
~
Update aliases into database format
$ sudo newaliases
Create mail script to set variables
File: ~/mail.sh
#!/bin/bash######################################################################### File: mail.sh## Usage: mail.sh <File Name to Mail> <Subject># Change the REPLYTO, FROM, and MAILTO variables# and choose RedHat or Debian## Who When Why# --------- ----------- -----------------------------------------------# D. Cohoon Feb-2023 VPS host name cannot be changed, so set headers#######################################################################functionusage(){/usr/bin/echo"Usage: ${0} <File Name to Mail> <Subject>"exit1}#------------------if[$#-lt2];thenusage
fi#if[!-z${1}]&&[!-f${1}];thenusagefi##------------------HOSTNAME=$(hostname-s)DOMAINNAME=$(hostname-d)FILE=${1}# First argshift1SUBJECT="${HOSTNAME}.${DOMAINNAME}:${@}"# Remainder of args##------------------exportREPLYTO=root@app.example.com
FROM=root@app.example.com
#FROM="${HOSTNAME}@${DOMAINNAME}"MAILTO=bob@example.com
##------------------# Debian: install mailutils#/usr/bin/cat ${FILE} | /usr/bin/mail -aFROM:${FROM} -s "${SUBJECT}" ${MAILTO}# RedHat: install s-nail#/usr/bin/cat ${FILE} | /usr/bin/mail --from-address=${FROM} -s "${SUBJECT}" ${MAILTO}
Monit - Monitor System and Restart Processes
Monit is a small Open Source utility for managing and monitoring Unix systems. Monit conducts automatic maintenance and repair and can execute meaningful causal actions in error situations.
Change the mailserver to yours, and add some general monitoring.
File: /etc/monit/monitrc:
# Mail server
set mailserver www.example.com port 25   # primary mailserver
# Don 28-Dec 2021 - general monitoring
check system $HOST
  if loadavg (1min) per core > 2 for 5 cycles then alert
  if loadavg (5min) per core > 1.5 for 10 cycles then alert
  if cpu usage > 95% for 5 cycles then alert
  if memory usage > 90% then alert
  if swap usage > 50% then alert

check device root with path /
  if space usage > 90% then alert
  if inode usage > 90% then alert
  if changed fsflags then alert
  if service time > 250 milliseconds for 5 cycles then alert
  if read rate > 500 operations/s for 5 cycles then alert
  if write rate > 200 operations/s for 5 cycles then alert

check network eth0 with interface eth0
  if failed link then alert
  if changed link then alert
  if saturation > 90%  for 2 cycles then alert
  if download > 10 MB/s for 5 cycles then alert
  if total uploaded > 1 GB in last hour then alert

check host REACHABILITY with address 1.1.1.1
  if failed ping with timeout 10 seconds then alert
Process
Monitor and restart the ssh process (and others that you may need using this as a guide).
File: /etc/monit/conf.d/sshd
check process sshd with pidfile /var/run/sshd.pid
    alert root@example.com with mail-format {
           from: monit@example.com
        subject: monit alert: $SERVICE $EVENT $DATE
        message: $DESCRIPTION
    }
  start program "/etc/init.d/ssh start"
  stop program "/etc/init.d/ssh stop"
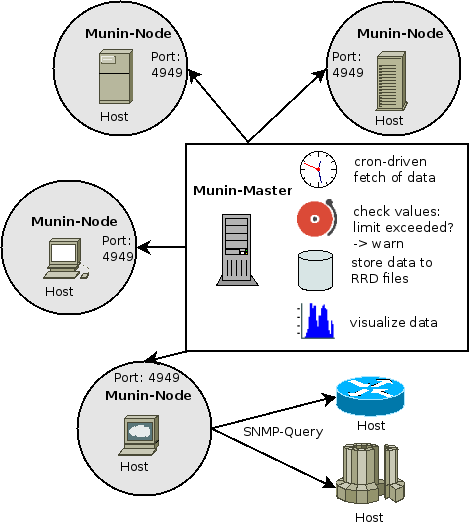
Munin - Resource History Monitor
Munin is a networked resource monitoring tool (started in 2002) that can help analyze resource trends and what just happened to kill our performance? problems. It is designed to be very plug and play.
A default installation provides a lot of graphs with almost no work. Requires Apache or nginx for graphs.
On Munin-Node node, add the Munin-Master IP address to the following:
File: /etc/munin/munin-node.conf
~
# A list of addresses that are allowed to connect.  This must be a
# regular expression, since Net::Server does not understand CIDR-style
# network notation unless the perl module Net::CIDR is installed.  You
# may repeat the allow line as many times as you'd like

allow ^127\.0\.0\.1$
allow ^::1$
allow ^192\.168\.1\.3$
allow ^fe80::abcd:1234:0000:abcd$
~
Check your munin-node functions from command line using the network cat utility
Debian -> $ sudo apt-get install ncat:
RedHat -> $ sudo dnf install ncat:
The utility munin-node-configure is used by the Munin installation procedure to check which plugins are suitable for your node and create the links automatically. It can be called every time when a system configuration changes (services, hardware, etc) on the node and it will adjust the collection of plugins accordingly. '-shell' will display new configuration plugin links 'ln -s ...' for you.
For instance, below a new network interface (if) was discovered since the last configuration of munin. To enable the new monitoring simply execute the 'ln -s ...' commands to create soft links, so interface veth2e40fe9 will be monitored.
Create a jail.local file to override the defaults. Update your email and IP addresses to suit your environment. Also add or disable applications you do not run. See the reference above for example of how to do that.
action = %(action_)s This defines the action to execute when a limit is reached. By default it will only block the user.
To receive an email at each ban, set it to:
action = %(action_mw)
To receive the logs with the mail, set it to:
action = %(action_mwl)
File: /etc/fail2ban/jail.local
[DEFAULT]
# email
destemail = don@example.com
sender = root@example.com
# ban & send an e-mail with whois report and relevant log lines
# to the destemail.
action = %(action_mwl)s
# whitelist
ignoreip = 127.0.0.1 192.168.1.0/24 8.8.8.8 1.1.1.1
Edit the autobackup configuration file, assigning LABEL=backup, and other items below:
File: /etc/autobackup.conf
~
# => File: /etc/autobackup.conf <=
# label of backup partition
LABEL=backup

# write messages to syslog
SYSLOG=1

# wait for device to appear (in seconds)
WAIT_FOR_DEVICE=2

# run a backup on every mount (i.e. multiple daily backups)
force_daily=0

# backup-levels - this must match your entries in /etc/rsnapshot.conf,
i.e.
# you must have a corresponding 'retain' or 'interval' entry.
# The autobackup-script will skip empty levels
daily="day"
weekly="week"
monthly="month"
yearly=""
"/etc/autobackup.conf" line 29 of 29 --100%--
Edit the rsnapshot configuration file, be sure to use TABS in the BACKUP POINTS / SCRIPTS section.
File: /etc/rsnapshot.conf
~# => File /etc/rsnapshot.conf <=############################ SNAPSHOT ROOT DIRECTORY ############################# All snapshots will be stored under this root directory.##snapshot_root /var/cache/rsnapshot/snapshot_root/tmp/autobackup/.autobackup/~~########################################## BACKUP LEVELS / INTERVALS ## Must be unique and in ascending order ## e.g. alpha, beta, gamma, etc. ##########################################retainday7retainweek4retainmonth3#retain year 3################################## BACKUP POINTS / SCRIPTS ################################### LOCALHOST# backup /etc/ ./# backup /var/backups/ ./# backup /usr/local/ ./# backup /home ./# NOTE: Use tabs!# LOCALHOST$backup^I/etc/^I./$backup^I/var/backups/^I./$backup^I/usr/local/^I./$backup^I/home^I^I./$~>"/etc/rsnapshot.conf"
Copy autobackup script from install to your home directory
Comment out lines 58 through 61 from "<" to ">" below, to allow running in cron.
autobackup-service normally runs automatically when a USB stick with the proper label is inserted into the machine. Comment out the if statement to allow it to run by cron.
File: $HOME/autobackup-service/autobackup.sh
58,61c60,64
<   if [ "${DEVICE:5:3}" != "$udev_arg" ]; then
<     msg "info: partition with label $LABEL is not on newly plugged device $udev_arg"
<     exit 0
<   fi
---
> # Don -> do not check, as we are screduling through cron
> #  if [ "${DEVICE:5:3}" != "$udev_arg" ]; then
> #    msg "info: partition with label $LABEL is not on newly plugged device $udev_arg"
> #    exit 0
> #  fi
Schedule in /etc/cron.d (change your home directory):
File: /etc/cron.d/autobackup-daily
# This is a cron file for autobackup/rsnapshot.
# 0 */4     * * *       root    /usr/bin/rsnapshot alpha
# 30 3      * * *       root    /usr/bin/rsnapshot beta
# 0  3      * * 1       root    /usr/bin/rsnapshot gamma
# 30 2      1 * *       root    /usr/bin/rsnapshot delta
SHELL=/bin/bash
PATH=/usr/local/sbin:/usr/local/bin:/sbin:/bin:/usr/sbin:/usr/bin
MAILTO="don@example.com"
# m h  dom mon dow user  command
55 12  *   *   *   root  /home/don/autobackup-service/autobackup.sh
Log entries will be in the syslog
$ sudo grep autobackup.sh /var/log/syslog
Jan 23 12:51:11 box autobackup.sh: info: LABEL           = backup
Jan 23 12:51:11 box autobackup.sh: info: WAIT_FOR_DEVICE = 2
Jan 23 12:51:11 box autobackup.sh: info: force_daily     = 0
Jan 23 12:51:11 box autobackup.sh: info: yearly          =
Jan 23 12:51:11 box autobackup.sh: info: monthly         = month
Jan 23 12:51:11 box autobackup.sh: info: weekly          = week
Jan 23 12:51:11 box autobackup.sh: info: daily           = day
Jan 23 12:51:13 box autobackup.sh: info: checking:
Jan 23 12:51:13 box autobackup.sh: info: mount-directory: /tmp/autobackup
Jan 23 12:51:13 box autobackup.sh: info: current year:  2021
Jan 23 12:51:13 box autobackup.sh: info: current month: 01
Jan 23 12:51:13 box autobackup.sh: info: current week:  03
Jan 23 12:51:13 box autobackup.sh: info: current day:   023
Jan 23 12:51:13 box autobackup.sh: info: starting backup for interval: month (last backup: 0)
Jan 23 12:51:13 box autobackup.sh: info: starting backup for interval: week (last backup: 0)
Jan 23 12:51:13 box autobackup.sh: info: starting backup for interval: day (last backup: 0)
Jan 23 12:51:15 box autobackup.sh: info: umounting /dev/sda1
Automatic Backup of PostgreSQL Database
Place a script in /etc/cron.daily and it will be run once a day, using the root account.
cron.daily
To check the times look here:
The Debian Way
$ grep run-parts /etc/crontab
17 *    * * *   root    cd / && run-parts --report /etc/cron.hourly
25 6    * * *   root    test -x /usr/sbin/anacron || ( cd / && run-parts --report /etc/cron.daily )
47 6    * * 7   root    test -x /usr/sbin/anacron || ( cd / && run-parts --report /etc/cron.weekly )
52 6    1 * *   root    test -x /usr/sbin/anacron || ( cd / && run-parts --report /etc/cron.monthly )
So our daily runs start at 6:25am every day.
The RedHat Way
# cat /etc/anacrontab
# /etc/anacrontab: configuration file for anacron

# See anacron(8) and anacrontab(5) for details.

SHELL=/bin/sh
PATH=/sbin:/bin:/usr/sbin:/usr/bin
MAILTO=root
# the maximal random delay added to the base delay of the jobs
RANDOM_DELAY=45
# the jobs will be started during the following hours only
START_HOURS_RANGE=3-22

#period in days   delay in minutes   job-identifier   command
1   5   cron.daily      nice run-parts /etc/cron.daily
7   25  cron.weekly     nice run-parts /etc/cron.weekly
@monthly 45 cron.monthly        nice run-parts /etc/cron.monthly
So our daily runs start ... any idea?
Backing up a PostrgreSQL database can be done while everything is up and running with the following script. Backups are stored in /data/backups.
File: /etc/cron.daily/backup_nextcloud
#!/bin/bashLOGFILE=/var/log/backup_db.log
ID=$(id-un)if[${ID}!="root"];thenecho"Must run as root, try sudo"exit1fi#echo$(date)${0}>>$LOGFILEumask027exportDATA=/data/backups
ifcd${DATA};then# Postgres#/usr/bin/pg_dump -c nextcloud > $DATA/nextcloud.db.$(date +%j) </dev/nullsudo-upostgres/usr/bin/pg_dump-cnextcloud>$DATA/nextcloud.db</dev/null
date>>$LOGFILEsync
sync
sync
sync
savelog-c7nextcloud.db>>$LOGFILE2>&1fi
Rsync - Remote File Synchronization
Rsync is a good way to keep a daily backup as it only copies changed files to the destination. Make sure you use a separate disk and preferably separate system, as rsync works great over the network.
The PostgreSQL backup above should be sent off to another system using this method. Another rsync script should be called by PostgreSQL backup to do the database network backup. Just copy this one, change the directories, and call it at the end of the database backup.
Schedule
This cron entry will run at 8:40am every day by user root.
File: /etc/cron.d/rsync
# This is a cron file for rsync to NAS
SHELL=/bin/bash
PATH=/usr/local/sbin:/usr/local/bin:/sbin:/bin:/usr/sbin:/usr/bin
MAILTO="don@example.com"
# m h  dom mon dow user  command
40 8  *   *   *   root  /mnt/raid1/rsync.sh noask
Script
This script will backup the local directory, /mnt/raid1/data, to a remote system (IP Address 192.168.1.2). The files on the remote system will be at /mnt/vol09/backups. The first run will copy everything, all next runs will only copy changed files. Any files deleted on the source will also be deleted on the destination.
To schedule in cron the parameter 'noask' is used, as shown above. Otherwise there is a prompt for y/n.
The last run's history is in log file /mnt/raid1/rsync.log.
File: /mnt/raid1/rsync.sh
#!/bin/bashDIR=/mnt/raid1
LOG=${DIR}/rsync.log
cd${DIR}
date>${LOG}ASK=${1}if[-z${ASK}];thenecho"Asking"fi#if[-z${ASK}];thenecho-n"Copy data? y/n: "readaskme
if[[$askme=~^[Yy]$]];thenrsync-avzz--ignore-errors--progress--delete${DIR}/dataroot@192.168.1.2:/mnt/vol09/backups/|tee-a${LOG}elseecho"Sync of data skipped"echo". . ."fielsersync-avzz--ignore-errors--progress--delete${DIR}/dataroot@192.168.1.2:/mnt/vol09/backups/|tee-a${LOG}fi#
date>>${LOG}
Logwatch - Daily Alert of Logging Activity
Logwatch is a customizable, pluggable log-monitoring system. It will go through your logs for a given period of time and make a report in the areas that you wish with the detail that you wish. Logwatch is being used for Linux and many types of UNIX.
Installation
Debian:
$sudoapt-getinstalllogwatch
Redhat:
$sudodnfinstalllogwatch
Schedule
File: /etc/cron.daily/00logwatch
#!/bin/bash#Check if removed-but-not-purgedtest-x/usr/share/logwatch/scripts/logwatch.pl||exit0#execute#/usr/sbin/logwatch --output mail
/usr/sbin/logwatch--mailtodon@example.com
#Note: It's possible to force the recipient in above command#Just pass --mailto address@a.com instead of --output mail
Add services
You can add iptables summary on the daily report. It shows which IP addresses have been blocked by UFW.
Logcheck - mails anomalies in the system logfiles to the admin
The logcheck program helps spot problems and security violations in your logfiles automatically and will send the results to you periodically in an e-mail. By default logcheck runs as an hourly cronjob just off the hour and after every reboot.
Normally the package installation will schedule a cron job for you. Check it here:
File: /etc/cron.d/logcheck
# Cron job runs at 2 minutes past every hour
# /etc/cron.d/logcheck: crontab entries for the logcheck package

PATH=/usr/local/sbin:/usr/local/bin:/sbin:/bin:/usr/sbin:/usr/bin
MAILTO=root

@reboot         logcheck    if [ -x /usr/sbin/logcheck ]; then nice -n10 /usr/sbin/logcheck -R; fi
2 * * * *       logcheck    if [ -x /usr/sbin/logcheck ]; then nice -n10 /usr/sbin/logcheck; fi

# EOF
Change email destination
Change SENDMAILTO variable to point to your email.
File: /etc/logcheck/logcheck.conf
~# Controls the address mail goes to:# *NOTE* the script does not set a default value for this variable!# Should be set to an offsite "emailaddress@some.domain.tld"#SENDMAILTO="logcheck"SENDMAILTO="don@example.com"~
Sysstat - Gather System Usage Statistics
The sysstat[1] package contains various utilities, common to many commercial Unixes, to monitor system performance and usage activity:
iostat reports CPU statistics and input/output statistics for block devices and partitions.
mpstat reports individual or combined processor related statistics.
pidstat reports statistics for Linux tasks (processes) : I/O, CPU, memory, etc.
tapestat reports statistics for tape drives connected to the system.
cifsiostat reports CIFS statistics.
Sysstat also contains tools you can schedule via cron or systemd to collect and historize performance and activity data:
sar collects, reports and saves system activity information (see below a list of metrics collected by sar).
sadc is the system activity data collector, used as a backend for sar.
sa1 collects and stores binary data in the system activity daily data file. It is a front end to sadc designed to be run from cron or systemd.
sa2 writes a summarized daily activity report. It is a front end to sar designed to be run from cron or systemd.
sadf displays data collected by sar in multiple formats (CSV, XML, JSON, etc.) and can be used for data exchange with other programs. This command can also be used to draw graphs for the various activities collected by sar using SVG (Scalable Vector Graphics) format.
Default sampling interval is 10 minutes but this can be changed of course (it can be as small as 1 second).
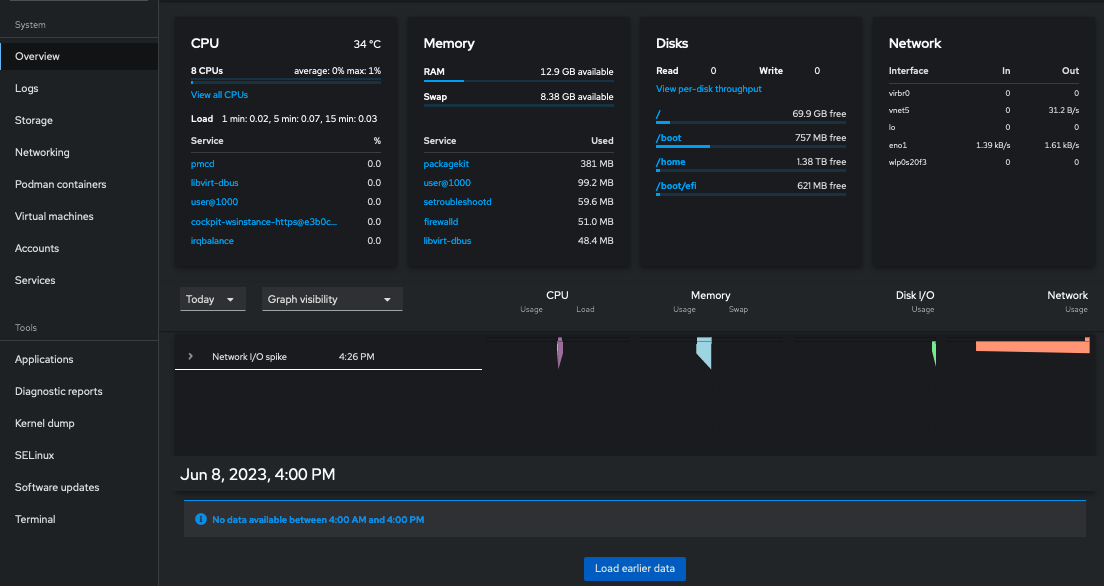
Redhat Cockpit uses pmlogger.service [2] from systemd. Install from Cockpit's Overview, Metrics and history.
RedHat pmstat [3]
$ pmstat
@ Mon Jun 12 10:02:01 2023
 loadavg                      memory      swap        io    system         cpu
   1 min   swpd   free   buff  cache   pi   po   bi   bo   in   cs  us  sy  id
    0.00 116224 231636   3284 13116m    0    0    0   17  348  387   0   0 100
    0.00 116224 233328   3284 13116m    0    0    0    0  339  383   0   0 100
    0.00 116224 228704   3284 13116m    0    0    0    0  333  358   0   0 100
    0.00 116224 227192   3284 13116m    0    0    0    6  493  548   0   0  99
^C
$ pmstat -a /var/log/pcp/pmlogger/bob.example.com/20230610.0.xz -t 2hour -A 1hour -z
Note: timezone set to local timezone of host "bob.example.com" from archive

@ Sat Jun 10 01:00:00 2023
 loadavg                      memory      swap        io    system         cpu
   1 min   swpd   free   buff  cache   pi   po   bi   bo   in   cs  us  sy  id
    0.08   2048  7646m   6440  6591m    0    0    0    3  198  237   0   0 100
    0.08   2048  7650m   6440  6596m    0    0    0    3  202  237   0   0 100
    0.06   2048  7643m   6440  6600m    0    0    0    3  204  236   0   0 100
    0.00   2048  7597m   6440  6624m    0    0    2   27  219  261   0   0 100
    0.09   2048  7609m   6440  6629m    0    0    0    3  215  259   0   0 100
    0.03   2048  7593m   6440  6633m    0    0    0    3  220  261   0   0 100
    0.00   2048  7585m   6440  6638m    0    0    0    4  223  263   0   0 100
    0.01      0 14402m   6740 495508    ?    ?    ?    ?    ?    ?   ?   ?   ?
    0.00      0 14268m   6740 630344    ?    ?    ?    ?    ?    ?   ?   ?   ?
    0.15      0 14272m   6740 634764    0    0    0    2  162  151   0   0 100
    0.13      0 14266m   6740 639188    0    0    0    2  164  152   0   0 100
 pmFetchGroup: End of PCP archive log
The timer is in the systemd configuration file. OnCalendar defines the interval. In this case data is collected every ten minutes. WantedBy defines that the timer should be active when the sysstat.service is running.
Use systemctl edit sysstat-collect.timer to edit this file. It will automatically create an override file in the right place and enable it for you, and preserve the change over release updates.
# /lib/systemd/system/sysstat-collect.timer# (C) 2014 Tomasz Torcz <tomek@pipebreaker.pl>## sysstat-12.5.2 systemd unit file:# Activates activity collector every 10 minutes[Unit]Description=Run system activity accounting tool every 10 minutes[Timer]OnCalendar=*:00/10[Install]WantedBy=sysstat.service
Above, Systemd edit override example changing the interval from 10 minutes to 5:
# ls -lrt /etc/systemd/system/sysstat-collect.timer.d/
total 4
-rw-r--r--. 1 root root 27 Feb 19 09:38 override.conf
# more /etc/systemd/system/sysstat-collect.timer.d/override.conf
[Timer]
OnCalendar=*:00/05
Report on system statistics over the last few days.
File: sar.sh
#!/bin/bash################################## Files are here:# ls -l /var/log/sysstat/# -rw-r--r-- 1 root root 49064 Feb 9 16:35 sa09## Report on some other day:# sar -u 2 3 -f /var/log/sysstat/sa15## Output to file:# sar -u 2 3 -o /tmp/logfile#################################echo"Disk"
sar-d23echo"Network"
sar-nDEV23echo"CPU"
sar-u23
sar-PALL-u23echo"Memory"
sar-r23echo"Paging"
sar-B23echo"Swap"
sar-S23echo"Load"
sar-q23
Monitor and notify disk health using smartmontools, and email any notifications.
Install software:
The Debian Way
$sudoapt-getinstallsmartmontools
The RedHat Way
$sudodnfinstallsmartmontools
Configure
Add Long monitoring test for Sunday (/dev/sda through /dev/sdX) and comment out DEVICESCAN:
The Debian Way
File: /etc/smartd.conf
The RedHat Way
File: /etc/smartmontools/smartd.conf
~# Don - 5-Nov-2021# -a Default: equivalent to -H -f -t -l error -l selftest -C 197 -U 198# -d TYPE Set the device type: ata, scsi, marvell, removable, 3ware,N, hpt,L/M/N# -n MODE No check. MODE is one of: never, sleep, standby, idle# -s REGE Start self-test when type/date matches regular expression (see man page)# T/MM/DD/d/HH # ^ ^ ^ ^ ^# | | | | + 24 Hour# | | | +-- Day of week, 1(monday) through 7(sunday)# | | +----- Day of month, 1 ~ 31# | +-------- Month of year, 01 (January) to 12 (December)# +---------- T is the type of test that should be run, options are:## L for long self-test# S for short self-test# C for conveyance test# O for an Offline immediate Test## -W D,I,C Monitor Temperature D)ifference, I)nformal limit, C)ritical limit# -m ADD Send warning email to ADD for -H, -l error, -l selftest, and -f#/dev/nvme0 -a -n never -W 2,30,40 -m don@example.com# Start long tests on Sunday 9am and short# self-tests every night at 2am and send errors to me#/dev/sda -a -n never -s (L/../../7/09|S/../.././02) -W 2,30,40 -m don@example.com -M test/dev/sda-a-nnever-s(L/../../7/09|S/../.././02)-W2,42,50-mdon@example.com-Mdiminishing#/dev/sdb -a -n never -s (L/../../7/09|S/../.././02) -W 2,30,40 -m don@example.com# Don - 5-Nov-2021~#DEVICESCAN -d removable -n standby -m root -M exec /usr/share/smartmontools/smartd-runner~
Restart
Restart smartd daemon to pick up configuration changes
$sudosystemctlrestartsmartd
Monitoring script for testing and reporting.
Change the DEV below and see if your disks support SMART monitoring.
#!/bin/bashDEV="/dev/sda"# Info
sudosmartctl-i"${DEV}"# Show
sudosmartctl-Pshow"${DEV}"# turn smart on/off#sudo smartctl -s on "${DEV}"# Errors?
sudosmartctl-lerror"${DEV}"# Health Check
sudosmartctl-Hc"${DEV}"# Selftest Log
sudosmartctl-lselftest"${DEV}"# Attributes# Problems if...# Reallocated_Sector_Ct > 0# Current_Pending_Sector > 0
sudosmartctl-A"${DEV}"##.... T E S T S ....# -> short ... couple of minutes# sudo smartctl -t short /dev/sda# -> long ... one hour# sudo smartctl -t long /dev/sda# -> Look at test results# sudo smartctl -a /dev/sda# #.... R E P O R T ....
sudosmartctl--attributes--log=selftest"${DEV}"## - Get the temprature
sudohddtemp/dev/sda
smartd database
The history of each smartd monitored disk is located here:
 _________________________________________
/ Your mind is the part of you that says, \
| "Why'n'tcha eat that piece of cake?"    |
| ... and then, twenty minutes later,     |
| says, "Y'know, if I were you, I         |
| wouldn't have done that!" -- Steven and |
\ Ondrea Levine                           /
 -----------------------------------------
        \   ^__^
         \  (oo)\_______
            (__)\       )\/\
                ||----w |
                ||     ||
File: /etc/issue
Look out!
File: /etc/issue.net
Looke out!
Example login
% ssh don@example Lookeout!_________________________________________/IndividualityMywordsareeasyto\|understandAndmyactionsareeasyto||performYetnoothercanunderstandor||performthem.Mywordshavemeaning;my||actionshavereason;Yetthesecannot||beknownandIcannotbeknown.Weare||eachunique,andthereforevaluable;||Thoughthesagewearscoarseclothes,||hisheartisjade.--LaoTse,"Tao Te |\ Ching"/-----------------------------------------\^__^
\(oo)\_______(__)\)\/\||----w|||||Lastlogin:SunAug2110:13:572022from192.168.1.4
Login notification
Add the following lines to the end of the system bashrc for notification whenever any user logs into the system (with the bash shell).
The Debian Way
File: /etc/bash.bashrc
The RedHat Way
File: /etc/bashrc
~
# Email logins - Don November 2020
echo $(who am i) ' just logged on ' $(hostname) ' ' $(date) $(who) | mail -s "Login on" don@example.com
Continue
Now that I have set up my new server, I'll consider giving it an internet name with DNS.
Proceeding in the order presented, some things are depending on prior setups.